6 DIY Where the Wild Things Are Party Decor Ideas

Transform Your Home Into a Wild Wonderland

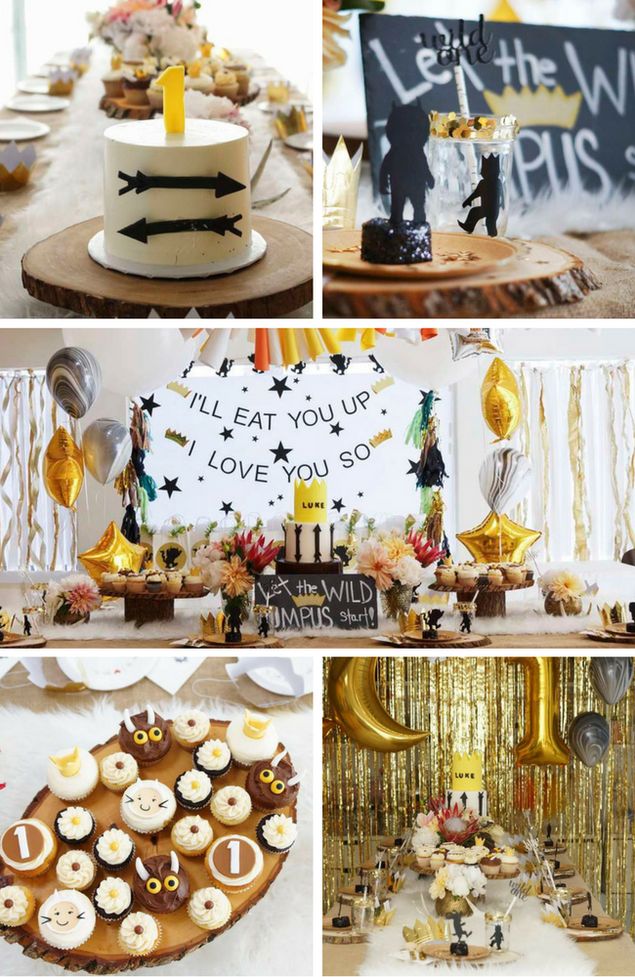
Imagine transforming your home into the enchanted, whimsical world of Maurice Sendak’s beloved children’s book, Where the Wild Things Are. Hosting a DIY party themed around this classic story not only creates an unforgettable experience for your guests but also allows you to channel your inner creativity. Here are six enchanting DIY decor ideas to help you bring this magical realm to life for your next children’s celebration.
1. Max's Crown Party Favors

Creating Max’s crown for each child not only sets the theme but also provides a delightful keepsake from the party. Here’s how you can make these:
Materials:
- Gold paper or gold spray paint
- Cardstock
- Elastic band or string
- Glue, scissors, and markers
Steps:
- Template: Use a template or draw your crown design.
- Cut Out: Cut the crowns from cardstock. If using spray paint, cut from plain cardstock first, then paint.
- Assembly: Glue the elastic band to each side to fit around the head. Allow drying time.
- Details: Use markers for facial features or any additional decorations.
💡 Note: Ensure the elastic band is gentle on children's heads. You might want to fit the crowns on them to check for comfort.
2. Wild Things Forest Backdrop

A backdrop transforms any space into the heart of the story. Here’s how to craft one:
Materials:
- Dark green and brown wrapping paper or large fabric sheets
- Craft paint (green, brown, black)
- Twigs, leaves, and moss for added texture
Steps:
- Base: Cover the wall or large area with your base color using the wrapping paper or fabric.
- Trees: Use paint or tear strips of paper to create a forest scene. Add branches and leaves with paint.
- Details: Glue or tape natural elements like twigs and leaves for an authentic forest look.
🌿 Note: Consider the weight of your materials to ensure the backdrop stays in place. Use painter's tape if necessary for a non-destructive option.
3. Wild Thing Plush Toys

Nothing screams “Where the Wild Things Are” more than these iconic characters. Here’s a simple way to DIY plush toys:
Materials:
- Plush toy blanks (can be found online or in craft stores)
- Felt or fabric in colors that match the characters
- Fabric glue or needle and thread
Steps:
- Design: Sketch or print character designs for reference.
- Cut Out: Cut felt or fabric pieces to resemble the faces, eyes, and other features.
- Attach: Glue or sew these pieces onto the plush toy blanks.
4. Max's Scepter Balloons

For a playful touch, create Max’s scepter:
Materials:
- Balloons in gold or metallic
- Wooden dowels or sticks
- Gold ribbon or washi tape
Steps:
- Inflate Balloons: Fill balloons with helium or tie them with sticks if they are not helium.
- Decorate Stick: Wrap the stick with ribbon or tape to resemble a scepter.
- Attach: Secure the balloon to the stick, ensuring it remains in place.
✨ Note: You can make these scepters reusable by not tying the balloons permanently, allowing for different balloon themes in the future.
5. Wild Rumpus Candy Bar

A candy bar themed around the book’s wildest scene:
Materials:
- Brown or forest-themed fabric for the backdrop
- Assorted candies in packaging that matches the forest theme (think greens, browns, and golds)
- Containers or baskets
- Name tags or labels inspired by the book’s characters
Steps:
- Setup: Lay out your fabric and arrange candy containers.
- Labeling: Create whimsical labels for the candies, referencing the book or characters.
- Display: Arrange candies with a wild, untamed look to match the theme.
6. Paper Tree Centerpieces

Simple, elegant centerpieces that evoke the forest setting:
Materials:
- Brown cardstock or construction paper
- Green paper or tissue paper for leaves
- Scissors, glue, and a base (like a plastic cup)
Steps:
- Tree Trunks: Cut out tree trunks from brown paper, create folds for a 3D effect.
- Leaves: Cut out leaves, or crumple tissue paper for a fuller look.
- Assembly: Attach leaves to trunks and fix onto a base.
As you embrace the spirit of Max and his wild companions, these DIY decorations help you to immerse your party guests in the enchanting world of Where the Wild Things Are. From creating crowns for party favors to crafting a forest scene for your backdrop, each element adds to the storybook atmosphere. Remember, the key to a successful themed party is to let your imagination run wild just like Max’s does in the book.
Engaging your guests in this fantastical environment not only provides them with a memorable experience but also fosters a sense of playful exploration. Whether it’s through the crafting of plush toys, decorating scepters with balloons, or setting up a candy bar with a wild twist, every DIY project not only beautifies the party but also deepens the connection to the theme.
Let’s keep the magic alive by answering some common questions related to hosting such a party:
How can I make my party invitations reflect the theme?

+
You can design your invitations with illustrations from the book, include a line from the story, or even create a scavenger hunt in the invitation where finding each clue leads to the party date, time, and location.
What are some simple food ideas that fit the theme?

+
Serve foods like “monster meatballs,” “wild thing pizza bites,” or “Max’s sailboat sandwiches” (cut sandwiches into sailboat shapes). For desserts, think about “wild rumpus cookies” with quirky monster faces drawn on them.
How do I handle the mess from all these DIY projects?

+
Create a crafting zone for any hands-on activities. Lay down protective table covers or sheets, have wet wipes and paper towels on hand, and plan to clean up as you go along to keep the space manageable.


